![]() 在 GitHub 上执行或查看/下载此 notebook
在 GitHub 上执行或查看/下载此 notebook
使用 HuggingFace 进行预训练模型和微调
训练 DNN 模型通常非常耗时且昂贵。因此,在可能的情况下,使用现成的预训练模型在各种场景下都非常方便。
在 SpeechBrain 中,我们提供了预训练模型,并且我们还鼓励用户使用 ![]() HuggingFace Hub
HuggingFace Hub![]() 分享他们自己的模型,因为我们坚信共享模型有助于研究。
分享他们自己的模型,因为我们坚信共享模型有助于研究。
您可以在这里浏览我们的官方预训练模型。
如果您有预训练模型并想将其包含在官方模型中,请考虑在 GitHub 上提交一个拉取请求,并提供您模型的所有详细信息!
我们提供了一种简单直接的方式来下载和实例化最先进的预训练模型,并将其用于直接推理、微调/知识蒸馏或您能想到的任何新奇技术!
通过本教程,您将学习如何
使用预训练模型对您的数据进行推理。
将预训练模型用作新管道的组件(例如语言模型、微调、说话人嵌入提取等)。
前提条件
安装依赖项
%%capture
# Installing SpeechBrain via pip
BRANCH = 'develop'
!python -m pip install git+https://github.com/speechbrain/speechbrain.git@$BRANCH
%%capture
import speechbrain
# here we download the material needed for this tutorial: images and an example based on mini-librispeech
!wget https://www.dropbox.com/s/b61lo6gkpuplanq/MiniLibriSpeechTutorial.tar.gz?dl=0
!tar -xvzf MiniLibriSpeechTutorial.tar.gz?dl=0
# downloading mini_librispeech dev data
!wget https://www.openslr.org/resources/31/dev-clean-2.tar.gz
!tar -xvzf dev-clean-2.tar.gz
使用预训练模型对您的数据进行推理
在本节中,我们将提供使用预训练模型执行各种任务的示例,包括
自动语音识别。
说话人识别、确认和分割。
声源分离
更多内容可在我们的 ![]() HuggingFace Hub
HuggingFace Hub![]() 中找到!
中找到!
自动语音识别
假设我们想在您的数据上试用一个预训练的 ASR 模型。
也许我们想看看我们的新语音增强算法是否也能改善词错误率,或者我们只是想转录一段讲座录音。
在 ![]() HuggingFace
HuggingFace![]() 上浏览模型后,我们选择了以下 ASR 管道:超酷的 SOTA ASR 管道,该管道在 LibriSpeech 上训练。
上浏览模型后,我们选择了以下 ASR 管道:超酷的 SOTA ASR 管道,该管道在 LibriSpeech 上训练。
此 ASR 管道由三个组件组成,详细信息请参阅此处
一个基于 CRDNN 的 seq2seq E2E ASR 模型,按照此recipe 训练。
一个基于 RNN 的 LM。
一个将单词转换为子词单元所需的 SentencePiece Tokenizer 对象。
现在,我们只需 3 行代码即可转录任何音频文件!
from speechbrain.inference.ASR import EncoderDecoderASR
asr_model = EncoderDecoderASR.from_hparams(source="speechbrain/asr-crdnn-rnnlm-librispeech", savedir="./pretrained_ASR", hparams_file="hyperparams_develop.yaml")
asr_model.transcribe_file("./LibriSpeech/dev-clean-2/1272/135031/1272-135031-0003.flac")
'THE LITTLE GIRL HAD BEEN ASLEEP BUT SHE HEARD THE RAPS AND OPENED THE DOOR'
我们可以通过查看此话语的 oracle 转录来验证此结果。
!head ./LibriSpeech/dev-clean-2/1272/135031/1272-135031.trans.txt
1272-135031-0000 BECAUSE YOU WERE SLEEPING INSTEAD OF CONQUERING THE LOVELY ROSE PRINCESS HAS BECOME A FIDDLE WITHOUT A BOW WHILE POOR SHAGGY SITS THERE A COOING DOVE
1272-135031-0001 HE HAS GONE AND GONE FOR GOOD ANSWERED POLYCHROME WHO HAD MANAGED TO SQUEEZE INTO THE ROOM BESIDE THE DRAGON AND HAD WITNESSED THE OCCURRENCES WITH MUCH INTEREST
1272-135031-0002 I HAVE REMAINED A PRISONER ONLY BECAUSE I WISHED TO BE ONE AND WITH THIS HE STEPPED FORWARD AND BURST THE STOUT CHAINS AS EASILY AS IF THEY HAD BEEN THREADS
1272-135031-0003 THE LITTLE GIRL HAD BEEN ASLEEP BUT SHE HEARD THE RAPS AND OPENED THE DOOR
1272-135031-0004 THE KING HAS FLED IN DISGRACE AND YOUR FRIENDS ARE ASKING FOR YOU
1272-135031-0005 I BEGGED RUGGEDO LONG AGO TO SEND HIM AWAY BUT HE WOULD NOT DO SO
1272-135031-0006 I ALSO OFFERED TO HELP YOUR BROTHER TO ESCAPE BUT HE WOULD NOT GO
1272-135031-0007 HE EATS AND SLEEPS VERY STEADILY REPLIED THE NEW KING
1272-135031-0008 I HOPE HE DOESN'T WORK TOO HARD SAID SHAGGY
1272-135031-0009 HE DOESN'T WORK AT ALL
看,很简单吧!
注意
此语法也可用于加载本地文件系统中的模型。实际上,如果模型已存在于本地 savedir 中,则不会二次下载。
from speechbrain.inference.ASR import EncoderDecoderASR
asr_model = EncoderDecoderASR.from_hparams(source="speechbrain/asr-crdnn-rnnlm-librispeech", savedir="./pretrained_ASR", hparams_file="hyperparams_develop.yaml")
说话人确认、识别和分割
现在假设我们想执行说话人分割等其他任务,并且需要一个说话人嵌入提取器。
幸运的是,我们可以直接使用此处提供的预训练 ECAPA TDNN 模型。该模型使用 Voxceleb 2 进行训练,我们可以用它来提取每个话语的说话人嵌入。
from speechbrain.inference.speaker import SpeakerRecognition
import torchaudio
verification = SpeakerRecognition.from_hparams(source="speechbrain/spkrec-ecapa-voxceleb", savedir="./pretrained_ecapa")
signal, fs = torchaudio.load('./LibriSpeech/dev-clean-2/1272/135031/1272-135031-0003.flac')
embedding = verification.encode_batch(signal)
embedding.shape
torch.Size([1, 1, 192])
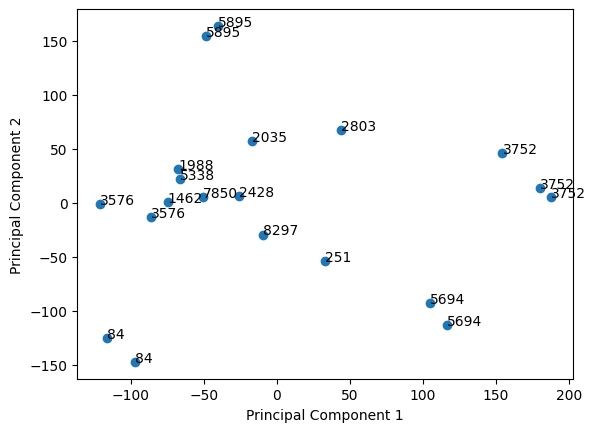
我们可以通过 PCA 可视化此 DNN 如何提取代表说话人身份的嵌入。
我们从 MiniLibriSpeech 语料库中随机选择 20 个话语
import glob
import numpy as np
utterances = glob.glob("./LibriSpeech/dev-clean-2/**/*.flac", recursive=True)
np.random.shuffle(utterances)
utterances = utterances[:20]
我们在整个话语上提取嵌入,并将相应的 oracle 说话人 ID 放入列表中。
from pathlib import Path

embeddings = []
labels = []
for u in utterances:
    tmp, fs = torchaudio.load(u)
    e = verification.encode_batch(tmp)
    embeddings.append(e[0, 0].numpy())
    spk_label = Path(u).parent.parent.stem
    labels.append(spk_label)
我们可以使用 sklearn PCA 进行可视化。
from sklearn.decomposition import PCA

embeddings = np.array(embeddings)

pca = PCA(n_components=2)
principalComponents = pca.fit_transform(embeddings)
最后,我们可以绘制结果。可以看出,即使仅使用 PCA 可视化两个成分,一些说话人也能很好地聚类
import matplotlib.pyplot as plt
fig, ax = plt.subplots()
ax.scatter(principalComponents[:, 0], principalComponents[:, 1])

for i, spkid in enumerate(labels):
    ax.annotate(spkid, (principalComponents[i, 0], principalComponents[i, 1]))
plt.xlabel("Principal Component 1")
plt.ylabel("Principal Component 2")
Text(0, 0.5, 'Principal Component 2')
给定使用 ECAPA-TDNN 模型计算的嵌入,我们可以按如下方式执行说话人确认
# Different files from the same speaker
file1 = './LibriSpeech/dev-clean-2/1272/135031/1272-135031-0000.flac' # Same speaker
file2 = './LibriSpeech/dev-clean-2/1272/141231/1272-141231-0004.flac' # Same speaker
file3 = './LibriSpeech/dev-clean-2/1462/170142/1462-170142-0000.flac'  # Different speaker

# Test with 2 files from the same speaker
score, prediction = verification.verify_files(file1, file2)
print(score, prediction)

# Test with 2 files from  different speakers
score, prediction = verification.verify_files(file1, file3)
print(score, prediction)
tensor([0.6952]) tensor([True])
tensor([0.0159]) tensor([False])
对于说话人确认,LibriSpeech 是一个非常简单的任务。然而,ECAPA 模型在其他类型的数据上也表现得非常好。使用 voxceleb,我们达到了 0.69% 的等错误率。您可以随意录制自己的声音(采样率为 16 kHz)并试一试!
声源分离
声源分离呢?[此处]:(https://hugging-face.cn/speechbrain/sepformer-wsj02mix) 提供了一个预训练的 SepFormer 模型。它可以直接用于对干净语音混合物进行分离。
我们在这里通过混合 MiniLibriSpeech 中的两个话语来创建一个人工混合物。
import torchaudio
s1, fs = torchaudio.load('./LibriSpeech/dev-clean-2/1272/135031/1272-135031-0003.flac')
s2, fs = torchaudio.load('./LibriSpeech/dev-clean-2/1462/170142/1462-170142-0001.flac')

# we resample because we will use a model trained on 8KHz data.
resampler = torchaudio.transforms.Resample(fs, 8000)
s1 = resampler(s1)
s2 = resampler(s2)
fs= 8000

min_len = min(s1.shape[-1], s2.shape[-1])
s1 = s1[:, :min_len]
s2 = s2[:, :min_len]
mix = s1 + s2
import IPython.display as ipd
我们可以听一下这个人造混合物。
ipd.Audio(mix[0], rate=fs)
现在,我们可以从 ![]() HuggingFace
HuggingFace![]() 实例化预训练的 SepFormer。
实例化预训练的 SepFormer。
from speechbrain.inference.separation import SepformerSeparation
separator = SepformerSeparation.from_hparams(source="speechbrain/sepformer-wsj02mix", savedir="./pretrained_sepformer")
然后我们用它来分离混合物
est_sources = separator.separate_batch(mix)
est_sources = est_sources[0] # strip batch dimension
您可以在此处听结果
ipd.Audio(est_sources[:, 0], rate=fs)
ipd.Audio(est_sources[:, 1], rate=fs)
微调或将预训练模型用作新管道的组件
在这里,我们将展示如何微调上一个示例中用于转录音频的 CRDNN Encoder Decoder Seq2Seq 模型,该模型从此处下载。
from speechbrain.inference.ASR import EncoderDecoderASR
asr_model = EncoderDecoderASR.from_hparams(source="speechbrain/asr-crdnn-rnnlm-librispeech", savedir="./pretrained_ASR", hparams_file="hyperparams_develop.yaml")
首先,我们可以看到预训练的 asr_model 允许轻松访问其所有组件
asr_model.mods.keys()
odict_keys(['normalizer', 'encoder', 'decoder', 'lm_model'])
这些键对应于超参数文件中指定的模块条目
modules:
    encoder: !ref <encoder>
    decoder: !ref <decoder>
    lm_model: !ref <lm_model>
我们还可以看到编码器实际上由几个子模块组成
encoder: !new:speechbrain.nnet.containers.LengthsCapableSequential
    input_shape: [null, null, !ref <n_mels>]
    compute_features: !ref <compute_features>
    normalize: !ref <normalize>
    model: !ref <enc>
这些可以简单地作为编码器的成员进行访问
asr_model.mods.encoder
LengthsCapableSequential(
  (compute_features): Fbank(
    (compute_STFT): STFT()
    (compute_fbanks): Filterbank()
    (compute_deltas): Deltas()
    (context_window): ContextWindow()
  )
  (normalize): InputNormalization()
  (model): CRDNN(
    (CNN): Sequential(
      (block_0): CNN_Block(
        (conv_1): Conv2d(
          (conv): Conv2d(1, 128, kernel_size=(3, 3), stride=(1, 1))
        )
        (norm_1): LayerNorm(
          (norm): LayerNorm((40, 128), eps=1e-05, elementwise_affine=True)
        )
        (act_1): LeakyReLU(negative_slope=0.01)
        (conv_2): Conv2d(
          (conv): Conv2d(128, 128, kernel_size=(3, 3), stride=(1, 1))
        )
        (norm_2): LayerNorm(
          (norm): LayerNorm((40, 128), eps=1e-05, elementwise_affine=True)
        )
        (act_2): LeakyReLU(negative_slope=0.01)
        (pooling): Pooling1d(
          (pool_layer): MaxPool2d(kernel_size=(1, 2), stride=(1, 2), padding=(0, 0), dilation=(1, 1), ceil_mode=False)
        )
        (drop): Dropout2d(
          (drop): Dropout2d(p=0.15, inplace=False)
        )
      )
      (block_1): CNN_Block(
        (conv_1): Conv2d(
          (conv): Conv2d(128, 256, kernel_size=(3, 3), stride=(1, 1))
        )
        (norm_1): LayerNorm(
          (norm): LayerNorm((20, 256), eps=1e-05, elementwise_affine=True)
        )
        (act_1): LeakyReLU(negative_slope=0.01)
        (conv_2): Conv2d(
          (conv): Conv2d(256, 256, kernel_size=(3, 3), stride=(1, 1))
        )
        (norm_2): LayerNorm(
          (norm): LayerNorm((20, 256), eps=1e-05, elementwise_affine=True)
        )
        (act_2): LeakyReLU(negative_slope=0.01)
        (pooling): Pooling1d(
          (pool_layer): MaxPool2d(kernel_size=(1, 2), stride=(1, 2), padding=(0, 0), dilation=(1, 1), ceil_mode=False)
        )
        (drop): Dropout2d(
          (drop): Dropout2d(p=0.15, inplace=False)
        )
      )
    )
    (time_pooling): Pooling1d(
      (pool_layer): MaxPool2d(kernel_size=(1, 4), stride=(1, 4), padding=(0, 0), dilation=(1, 1), ceil_mode=False)
    )
    (RNN): LSTM(
      (rnn): LSTM(2560, 1024, num_layers=4, batch_first=True, dropout=0.15, bidirectional=True)
    )
    (DNN): Sequential(
      (block_0): DNN_Block(
        (linear): Linear(
          (w): Linear(in_features=2048, out_features=512, bias=True)
        )
        (norm): BatchNorm1d(
          (norm): BatchNorm1d(512, eps=1e-05, momentum=0.1, affine=True, track_running_stats=True)
        )
        (act): LeakyReLU(negative_slope=0.01)
        (dropout): Dropout(p=0.15, inplace=False)
      )
      (block_1): DNN_Block(
        (linear): Linear(
          (w): Linear(in_features=512, out_features=512, bias=True)
        )
        (norm): BatchNorm1d(
          (norm): BatchNorm1d(512, eps=1e-05, momentum=0.1, affine=True, track_running_stats=True)
        )
        (act): LeakyReLU(negative_slope=0.01)
        (dropout): Dropout(p=0.15, inplace=False)
      )
    )
  )
)
asr_model.mods.encoder.compute_features
Fbank(
  (compute_STFT): STFT()
  (compute_fbanks): Filterbank()
  (compute_deltas): Deltas()
  (context_window): ContextWindow()
)
训练超参数也可以轻松访问
dir(asr_model.hparams)
['__class__',
 '__delattr__',
 '__dict__',
 '__dir__',
 '__doc__',
 '__eq__',
 '__format__',
 '__ge__',
 '__getattribute__',
 '__gt__',
 '__hash__',
 '__init__',
 '__init_subclass__',
 '__le__',
 '__lt__',
 '__ne__',
 '__new__',
 '__reduce__',
 '__reduce_ex__',
 '__repr__',
 '__setattr__',
 '__sizeof__',
 '__str__',
 '__subclasshook__',
 'activation',
 'asr_model',
 'beam_size',
 'blank_index',
 'bos_index',
 'cnn_blocks',
 'cnn_channels',
 'cnn_kernelsize',
 'compute_features',
 'coverage_penalty',
 'coverage_scorer',
 'ctc_lin',
 'dec',
 'dec_neurons',
 'decoder',
 'dnn_blocks',
 'dnn_neurons',
 'dropout',
 'emb',
 'emb_size',
 'enc',
 'encoder',
 'eos_index',
 'eos_threshold',
 'inter_layer_pooling_size',
 'lm_model',
 'lm_weight',
 'log_softmax',
 'max_attn_shift',
 'max_decode_ratio',
 'min_decode_ratio',
 'modules',
 'n_fft',
 'n_mels',
 'normalizer',
 'output_neurons',
 'pretrainer',
 'rnn_bidirectional',
 'rnn_class',
 'rnn_layers',
 'rnn_neurons',
 'rnnlm_scorer',
 'sample_rate',
 'scorer',
 'seq_lin',
 'temperature',
 'temperature_lm',
 'time_pooling_size',
 'tokenizer',
 'using_max_attn_shift']
此类信息非常有用,我们可以在微调管道中直接使用其中一些超参数,以确保与预训练模型兼容(例如,使用相同的 BOS 或 EOS 索引)!
设置数据管道
首先,我们必须为下载的 MiniLibriSpeech 数据设置数据管道。
如果您不熟悉 SpeechBrain dataIO,您可能需要查看教程。
import speechbrain as sb
import torch
我们将 MiniLibriSpeech 解析为合适的 JSON 标注
from parse_data import parse_to_json # parse_data is a local library downloaded before (see Installing Dependencies step)
parse_to_json("./LibriSpeech/dev-clean-2")
我们从 JSON 标注实例化一个 DynamicItemDataset
from speechbrain.dataio.dataset import DynamicItemDataset
dataset = DynamicItemDataset.from_json("data.json")
我们根据长度对数据集进行排序以加快训练速度
dataset = dataset.filtered_sorted(sort_key="length", select_n=100)
# we limit the dataset to 100 utterances to keep the trainin short in this Colab example
并添加一个用于读取音频的管道
dataset.add_dynamic_item(sb.dataio.dataio.read_audio, takes="file_path", provides="signal")
以及另一个用于编码标注中单词的管道。
值得注意的是,我们使用了从预训练的 asr_model 中获得的 Tokenizer 对象,并且我们使用 asr_model.tokenizer.encode_as_ids(words) 对单词进行编码。我们还重用了通过 asr_model.hparams 访问的 asr_model 的 eos_index 和 bos_index,以确保所有这些参数与预训练时使用的参数一致!
# 3. Define text pipeline:
@sb.utils.data_pipeline.takes("words")
@sb.utils.data_pipeline.provides(
        "words", "tokens_list", "tokens_bos", "tokens_eos", "tokens")
def text_pipeline(words):
      yield words
      tokens_list = asr_model.tokenizer.encode_as_ids(words)
      yield tokens_list
      tokens_bos = torch.LongTensor([asr_model.hparams.bos_index] + (tokens_list))
      yield tokens_bos
      tokens_eos = torch.LongTensor(tokens_list + [asr_model.hparams.eos_index]) # we use same eos and bos indexes as in pretrained model
      yield tokens_eos
      tokens = torch.LongTensor(tokens_list)
      yield tokens
dataset.add_dynamic_item(text_pipeline)
我们将数据集对象设置为返回信号张量以及编码的 token 和单词。
dataset.set_output_keys(["id", "signal", "words", "tokens_list", "tokens_bos", "tokens_eos", "tokens"])
dataset[0]
{'id': '777-126732-0081',
 'signal': tensor([-9.1553e-05, -3.6621e-04, -4.8828e-04,  ...,  2.1362e-04,
          2.4414e-04,  3.3569e-04]),
 'words': 'COMFORTABLE DEAR',
 'tokens_list': [875, 157, 598],
 'tokens_bos': tensor([  0, 875, 157, 598]),
 'tokens_eos': tensor([875, 157, 598,   0]),
 'tokens': tensor([875, 157, 598])}
微调 ASR 模型
首先,我们定义将执行微调的 Brain 类。在这里,我们只是采用了一个类似于原始 Seq2Seq LibriSpeech recipe 的 Brain 类示例。
from speechbrain.lobes.features import Fbank
import torch

# Define fine-tuning procedure
class EncDecFineTune(sb.Brain):

    def on_stage_start(self, stage, epoch):
        # enable grad for all modules we want to fine-tune
        if stage == sb.Stage.TRAIN:
            for module in [self.modules.enc, self.modules.emb, self.modules.dec, self.modules.seq_lin]:
                for p in module.parameters():
                    p.requires_grad = True

    def compute_forward(self, batch, stage):
        """Forward computations from the waveform batches to the output probabilities."""
        batch = batch.to(self.device)
        wavs, wav_lens = batch.signal
        tokens_bos, _ = batch.tokens_bos
        wavs, wav_lens = wavs.to(self.device), wav_lens.to(self.device)

        # Forward pass
        feats = self.modules.compute_features(wavs)
        feats = self.modules.normalize(feats, wav_lens)
        #feats.requires_grad = True
        x = self.modules.enc(feats)

        e_in = self.modules.emb(tokens_bos)  # y_in bos + tokens
        h, _ = self.modules.dec(e_in, x, wav_lens)

        # Output layer for seq2seq log-probabilities
        logits = self.modules.seq_lin(h)
        p_seq = self.hparams.log_softmax(logits)

        return p_seq, wav_lens

    def compute_objectives(self, predictions, batch, stage):
        """Computes the loss (CTC+NLL) given predictions and targets."""


        p_seq, wav_lens = predictions

        ids = batch.id
        tokens_eos, tokens_eos_lens = batch.tokens_eos
        tokens, tokens_lens = batch.tokens

        loss = self.hparams.seq_cost(
            p_seq, tokens_eos, tokens_eos_lens)


        return loss
在这里,我们定义了之前定义的 Brain 类所需的模块和超参数。
我们通过访问预训练模型的 modules 和 hparams 直接获取它们。这些可以在模型 HuggingFace repo 中的 hyperparams.yaml 文件中找到。
modules = {"enc": asr_model.mods.encoder.model,
           "emb": asr_model.hparams.emb,
           "dec": asr_model.hparams.dec,
           "compute_features": asr_model.mods.encoder.compute_features, # we use the same features
           "normalize": asr_model.mods.encoder.normalize,
           "seq_lin": asr_model.hparams.seq_lin,

          }

hparams = {"seq_cost": lambda x, y, z: speechbrain.nnet.losses.nll_loss(x, y, z, label_smoothing = 0.1),
            "log_softmax": speechbrain.nnet.activations.Softmax(apply_log=True)}

brain = EncDecFineTune(modules, hparams=hparams, opt_class=lambda x: torch.optim.SGD(x, 1e-5))
brain.tokenizer = asr_model.tokenizer
预训练模型最终可以进行微调
brain.fit(range(2), train_set=dataset,
          train_loader_kwargs={"batch_size": 8, "drop_last":True, "shuffle": False})
100%|██████████| 12/12 [05:44<00:00, 28.69s/it, train_loss=1.31]
100%|██████████| 12/12 [05:35<00:00, 27.99s/it, train_loss=1.28]
Pretrainer 类
在 speechbrain 中,执行预训练的另一种方法是使用 PreTrainer 类 (speechbrain.utils.parameter_transfer.Pretrainer)。它以更结构化的方式协调参数迁移,这有助于编写易于共享的 recipe(并且它也是实现 speechbrain.pretrained 模型的核心)。要使用它,首先初始化一个模型
from speechbrain.lobes.models.ECAPA_TDNN import ECAPA_TDNN

model = ECAPA_TDNN(input_size= 80,
                   channels= [1024, 1024, 1024, 1024, 3072],
                   kernel_sizes= [5, 3, 3, 3, 1],
                   dilations= [1, 2, 3, 4, 1],
                   attention_channels= 128,
                   lin_neurons = 192)
在此阶段,模型使用随机参数进行初始化。但是,我们可以使用我们的 pretrainer 将随机参数替换为保存在检查点中的参数
from speechbrain.utils.parameter_transfer import Pretrainer

# Initialization of the pre-trainer
pretrain = Pretrainer(loadables={'model': model}, paths={'model': 'speechbrain/spkrec-ecapa-voxceleb/embedding_model.ckpt'})

# We download the pretrained model from HuggingFace in this case
pretrain.collect_files()
pretrain.load_collected()
现在,模型不再是随机初始化的,而是包含 embedding_model.ckpt 的预训练参数。预训练模型的路径可以是本地路径、网络 URL 或 huggingface 仓库
# Local Path
pretrain = Pretrainer(collect_in='model_local', loadables={'model': model}, paths={'model': 'model_checkpoints/model.ckpt'})
pretrain.collect_files()
pretrain.load_collected()

# Or web
pretrain = Pretrainer(collect_in='model_web', loadables={'model': model}, paths={'model': 'https://www.dropbox.com/s/2mdnl784ram5w8o/embedding_model.ckpt?dl=1'})
pretrain.collect_files()
pretrain.load_collected()
正如您所见,您可以使用变量 collect_in 来设置预训练模型的存储位置。
致谢
非常感谢 (ziz19) 帮助改进本教程。
引用 SpeechBrain
如果您在研究或商业中使用 SpeechBrain,请使用以下 BibTeX 条目引用它
@misc{speechbrainV1,
  title={Open-Source Conversational AI with {SpeechBrain} 1.0},
  author={Mirco Ravanelli and Titouan Parcollet and Adel Moumen and Sylvain de Langen and Cem Subakan and Peter Plantinga and Yingzhi Wang and Pooneh Mousavi and Luca Della Libera and Artem Ploujnikov and Francesco Paissan and Davide Borra and Salah Zaiem and Zeyu Zhao and Shucong Zhang and Georgios Karakasidis and Sung-Lin Yeh and Pierre Champion and Aku Rouhe and Rudolf Braun and Florian Mai and Juan Zuluaga-Gomez and Seyed Mahed Mousavi and Andreas Nautsch and Xuechen Liu and Sangeet Sagar and Jarod Duret and Salima Mdhaffar and Gaelle Laperriere and Mickael Rouvier and Renato De Mori and Yannick Esteve},
  year={2024},
  eprint={2407.00463},
  archivePrefix={arXiv},
  primaryClass={cs.LG},
  url={https://arxiv.org/abs/2407.00463},
}
@misc{speechbrain,
  title={{SpeechBrain}: A General-Purpose Speech Toolkit},
  author={Mirco Ravanelli and Titouan Parcollet and Peter Plantinga and Aku Rouhe and Samuele Cornell and Loren Lugosch and Cem Subakan and Nauman Dawalatabad and Abdelwahab Heba and Jianyuan Zhong and Ju-Chieh Chou and Sung-Lin Yeh and Szu-Wei Fu and Chien-Feng Liao and Elena Rastorgueva and François Grondin and William Aris and Hwidong Na and Yan Gao and Renato De Mori and Yoshua Bengio},
  year={2021},
  eprint={2106.04624},
  archivePrefix={arXiv},
  primaryClass={eess.AS},
  note={arXiv:2106.04624}
}